
You will find no print display screen button on your Apple iphone, but you can consider a screenshot on an Apple iphone with just a couple of button presses. It would not make any difference if you have the Apple iphone 8, Apple iphone 15, or any other product of Iphone — they can all do this. Employing screenshots is a fantastic way to share complications with smartphone updates, funny matters you see on websites, or that strange textual content you just acquired. All you will need to know is what the proper buttons are, which we will cover below, along with a handful of methods to spruce up your Iphone screenshotting video game.
Notice: Are you a MacOS user? If so, we have also have a thorough manual on how to take a screenshot on a Mac.
Taking a screenshot is as basic as pressing two of the bodily buttons at the similar time, but which two buttons to press is dependent on which model of Iphone you happen to be using.
Taking a screenshot on more recent iPhones
Here are the buttons to press if you have an Iphone without the need of a home button. Which is to say you are applying 1 of the very best iPhones of right now.
Move 1: The first button you’ll want to push is the button positioned near the major-ideal corner of your Iphone. This is the exact same button you commonly press to change your display screen off and lock your Apple iphone.
Phase 2: The other button you are going to have to have to press is Volume Up, found on the left facet of your Apple iphone.
Jesse Hollington / Electronic Tendencies
Stage 3: To consider the screenshot, press the two buttons at the identical time.

Graphic utilised with authorization by copyright holder
Having a screenshot on an Apple iphone with a “Dwelling” button
If you still have an older Iphone, or just picked up a refurbished Iphone that is on the more mature facet, you will comply with the identical methods as higher than, but will push the household button as the next button described previously mentioned.

Jesse Hollington / Electronic Tendencies
Capturing a screenshot utilizing AssistiveTouch
AssistiveTouch makes it possible for the consumer to complete much more complex touch-based mostly commands on the Iphone — like pinching, multifinger swiping, or activating 3D Contact — through a very simple menu that is just a few faucets absent. This is handy for a great deal of items, but in this circumstance it can be an option way to get screenshots if one of your buttons is not working adequately of you might be unable to press both of those of them at the same time. Here’s how to set this up and use it.
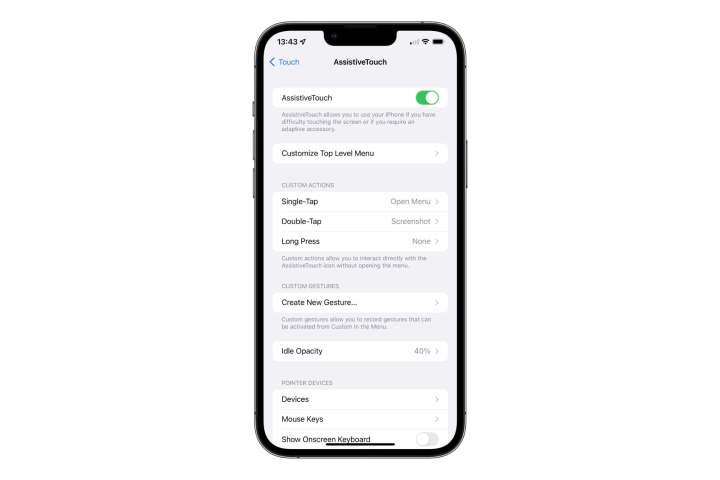
Phase 1: Navigate to the Settings app.
Action 2: Tap Accessibility.
Action 3: Tap Touch.
Move 4: Tap AssistiveTouch
Stage 5: Toggle AssistiveTouch on. You’ll see the AssistiveTouch button show up on your display, resembling a collection of light, concentric circles.
Stage 6: Tap Double-Tap.
Jesse Hollington / Digital Tendencies
Step 7: Scroll down and faucet Screenshot.
Stage 8: Swipe up to return to the Residence Display. The AssistiveTouch button should continue being on display.
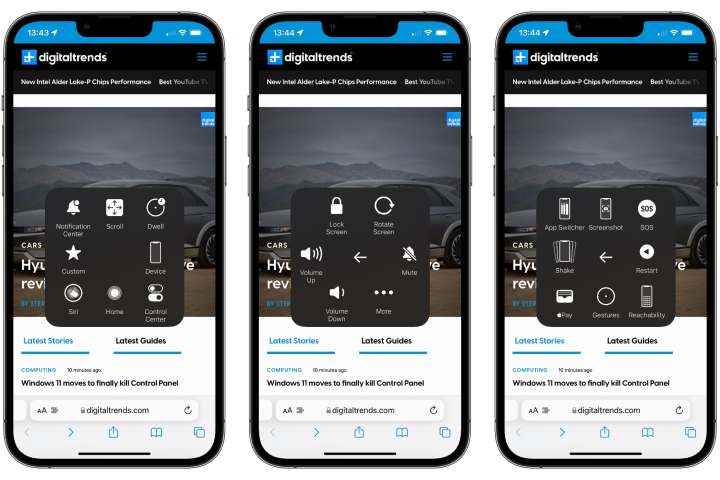
Move 9: When you discover a screen that you want to preserve an graphic of, double-tap the AssistiveTouch button. Your Apple iphone show will briefly flash white and you’ll also hear the identical shutter noise that you do when having a photo in the Iphone Digital camera app, as very long as your gadget just isn’t in silent method.
Phase 10: A thumbnail of the screenshot will show up in the bottom-left corner of the screen. After a number of seconds, this will disappear and the screenshot will be immediately saved to your photo library. You can also swipe it absent at any time to preserve it to your photo library instantly, or tap on it to crop, annotate, or share it employing the steps explained previously.
Be aware that AssistiveTouch gives a range of other means to do this as very well. For example, if you like, you can assign the Screenshot shortcut to a Extensive Push instead of a Double-Tap. You can also single-faucet on the AssistiveTouch button to open up a menu that includes a prosperity of other features. You can also capture a screenshot from this menu by tapping System > More > Screenshot, which could be helpful if you’d alternatively assign the Double-Faucet and Lengthy Push actions to execute other jobs.
Jesse Hollington / Electronic Tendencies
Jesse Hollington / Electronic Trends
Edit and annotate a captured screenshot
The moment you efficiently seize a screenshot, you will see a tiny preview in the base-remaining corner of your screen. This preview will routinely disappear in a few seconds, but you can also swipe it to the still left to dismiss it. In this situation, the screenshot will get tucked absent properly in your image library and you can have on with whatever you had been executing prior to.
On the other hand, you can also pull up the screenshot to make some rapid edits and annotations in advance of that occurs. Here is how.
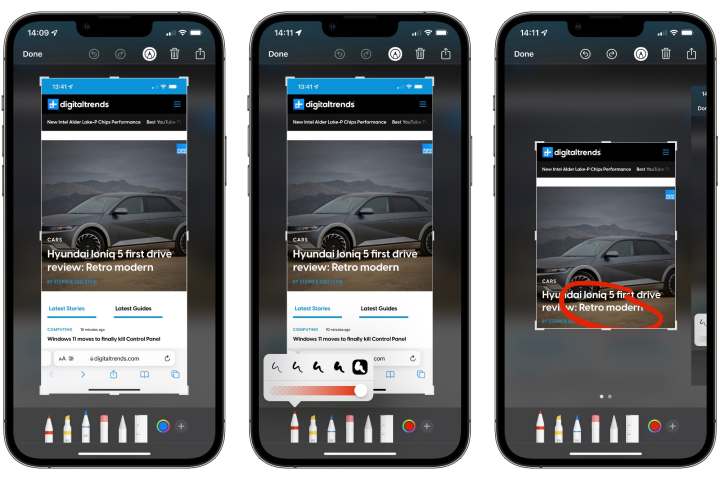
Stage 1: After having a screenshot, tap on the thumbnail that seems in the base-left corner of your screen.
Stage 2: Your screenshot will open in a simplified editing window, all set to be cropped or annotated.
Phase 3: If you would want to help save only a part of your screenshot, you alter the cropping handles to draw a box all-around the part you want to hold. You can also use the conventional pinch-to-zoom gesture to enlarge a portion of your screenshot.
Move 4: You can also add markup and other annotations to your screenshot by drawing with your finger. A assortment of diverse annotation instruments can be found at the base of the editing screen. You can also find Undo and Redo buttons at the major of the display screen so you can wander again any edits you will not like.
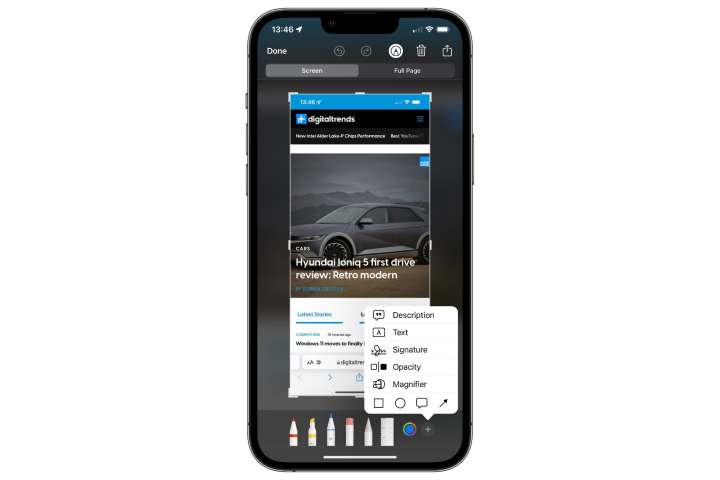
Phase 5: To insert innovative annotations, these kinds of as a text box, magnifier loupe, or your signature, tap the Furthermore button in the base-proper corner and pick out the appropriate choices from the pop-up menu.
Jesse Hollington / Electronic Tendencies
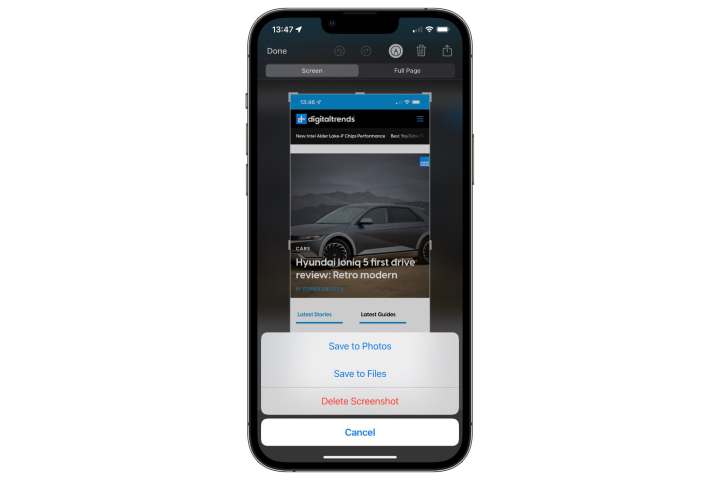
Action 6: When you are concluded earning edits, faucet Completed in the upper-still left corner.
Jesse Hollington / Digital Tendencies
Stage 7: Decide on Help you save to Pictures or Save to Data files to save the resulting image to your photograph library or iCloud Drive, respectively. You can also tap Delete Screenshot if you’ve got altered your mind and never want to save it.
Take note that if you acquire a number of screenshots in succession, they’ll all appear up in the editing window at the exact same time. You can swipe remaining and correct to shift in between them and edit every single one particular individually. You can discard an person screenshot from this enhancing look at by tapping the Trash can icon at the major of the screen. Tapping Accomplished will prompt you to save or delete the total set.
Jesse Hollington / Electronic Traits
Share a screenshot
By default, screenshots are immediately saved to your picture library, in which you can share them in the exact same way as any other photo. Nevertheless, if you’re grabbing a screenshot exclusively to share with somebody or write-up on social media, you can share it right away. This also lets you steer clear of conserving a duplicate to your picture library if you never need to hold it all around afterward. Here is how.
Phase 1: Following having a screenshot, tap on the thumbnail that appears in the base-still left corner of your monitor.
Stage 2: Your screenshot will open up in the annotation mode explained in the very last area.
Move 3: If you want to crop or annotate your screenshot before sharing it, go right in advance.
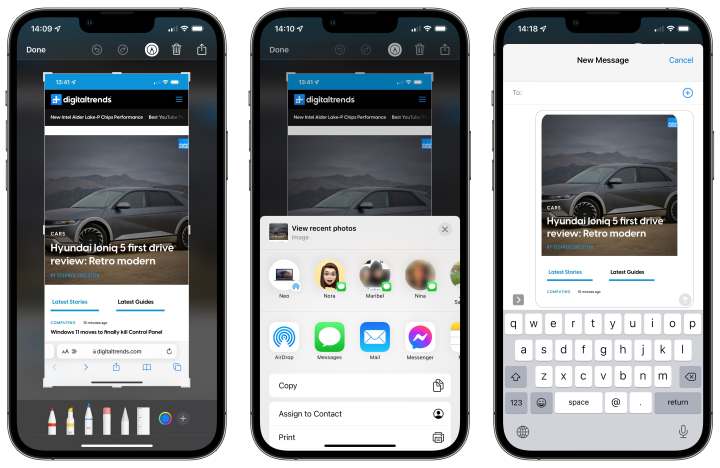
Move 4: When concluded, tap the Share button in the major-suitable corner.
Step 5: The standard iOS Share Sheet will look, permitting you send out the picture out via textual content message or e-mail, article it on social media, deliver it to a further Apple product via AirDrop, or even help you save it someplace else, like in Apple Notes.
Move 6: If you want to share your screenshot to an additional company, faucet the Share button once more. You can repeat these methods as generally as you like to share to various spots.
Move 7: When you’re finished sharing, faucet Finished in the higher-left corner.
Step 8: Pick out Conserve to Photographs or Preserve to Data files if you want to retain a duplicate of your screenshot otherwise tap Delete Screenshot. This choice only influences no matter if the screenshot gets saved in your image library or iCloud Generate —i t will nonetheless be sent or saved in all of the other destinations you’ve got shared it to.
Even further studying
Did you know that you can use button combinations to restore your Iphone? Look at out our guidebook to master how. If you’re new to iOS, there are even extra iOS ideas and tricks to assistance you grasp your Iphone.
Editors’ Suggestions